Nouvelles
Nouvelles
first time setup: assembling your BLSTR sander
par Koen Meukens le sept. 25 2025
Congratulations on your new BLSTR Sander! Setting up your tool correctly is crucial for ensuring optimal performance and safety. This article will guide you through the assembly process, helping you get started on your sandblasting projects as quickly and smoothly as possible.
1. Unpack Your BLSTR Sander
Begin by carefully removing the BLSTR Sander and all accompanying accessories from the packaging. Make sure to check against the included parts list to confirm that all components are present. Lay out the parts on a clean, flat surface for easy access.
2. Inspect Each Component
Before assembly, inspect each component for any signs of damage incurred during shipping. If you find any defects, contact customer support for assistance before proceeding.
3. Assemble the Grit Container
Attach the grit container to the body of the sander. It should be screwed into place securely. This container will hold the abrasive material used during the sandblasting process.
4. Attach the Handle
Next, attach the handle to the side of the sander. Ensure that it is tightly secured to prevent it falling of during operation. The and hand protection shield protect your hand from abrasive material and ensures a secure grip during the sanding operation.
5. Connect to Power
Your BLSTR Sander is a corded model, so locate a suitable power outlet before you plan to work. Ensure that the outlet is close enough to allow you freedom of movement in your working area but far enough away to keep the cord out of your way as you work. Plug in the sander, but keep it turned off until you are ready to begin sandblasting.
6. Check the Grit Flow Adjustment
Before using your sander, check the grit flow adjustment setting. Your BLSTR Sander features an adjustable control that allows you to set the rate at which the grit is fed through the machine. For your first use, start with a lower setting to get a feel for the sandblasting process and adjust as needed.
7. Safety Check
After assembling your BLSTR Sander, perform a quick safety check to ensure everything is secure. Make sure the power cord is intact, the grit container is properly fastened, and the handle is securely attached.
8. Ready for a Test Run
Now that your BLSTR Sander is assembled, it's a good idea to do a test run before starting your actual project. Choose a small, inconspicuous area and try a brief sandblasting session to ensure everything is working as expected.
With your BLSTR Sander now fully assembled and checked, you’re ready to tackle your sandblasting projects! Remember to wear appropriate personal protective equipment (PPE) and follow all safety guidelines while operating the sander. Enjoy the process of transforming surfaces with precision and ease.
Nouvelles
par Koen Meukens le juil. 03 2025
Choisir le bon grain
Lors de l'utilisation de votre outil de sablage, le choix de la granulométrie est crucial. Privilégiez des grains compris entre 0,2 et 0,5 mm pour éviter toute déception. L'utilisation de grains inadaptés peut entraîner des résultats médiocres dès le départ.
Notre ponceuse BLSTR est conçue pour fonctionner de manière similaire à un compresseur de 100 L et 10 bars équipé d'un pistolet de sablage. Il est important de noter que les performances de cet outil ne sont pas comparables à celles d'un compresseur Atlas Copco de 95 bars. Par conséquent, l'élimination du revêtement en poudre sur les surfaces métalliques sera tout aussi difficile qu'avec le compresseur de 10 bars mentionné précédemment. Pour vous familiariser avec la ponceuse BLSTR, nous vous recommandons de commencer par des surfaces plus grandes comme du bois peint, du métal ou même du simple carton. Cela vous permettra d'observer l'impact du faisceau sur la surface et de mieux comprendre ses capacités. Toutes nos vidéos de démonstration sont authentiques et illustrent les performances de votre ponceuse BLSTR. Cependant, gardez à l'esprit que plusieurs facteurs influencent le résultat, notamment le type d'ancienne peinture utilisée, le nombre et l'épaisseur des couches. Voir les vidéos ici
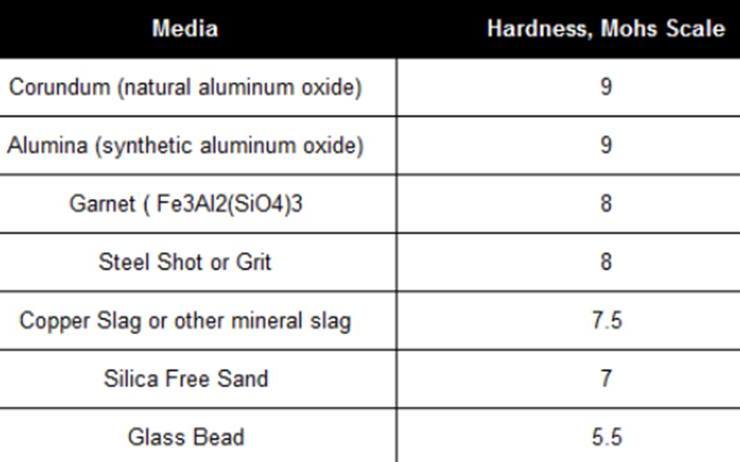
De plus, voici un autre graphique illustrant la dureté des différents grains. N'oubliez pas que le nombre le plus élevé représente le grain le plus dur.
Découvrez les accessoires assortis et où les acheter ici !
Bonne chance et bon BLSTting !
Texte personnalisé
La ponceuse BLSTR® est la première sableuse portable au monde.